Modelling by numbers
An introduction to procedural geometry
A while ago, I posted a tutorial, or rather a series of tutorials, about generating procedural meshes in Unity. It got quite long, and I had to remove a bunch of topics that I had originally intended to cover. The Modelling by numbers tutorial got a very positive response, and also quite a few people asking for extra information, mostly to do with the topics that I had discarded. So I figured I’d revisit them. What follows is one of them.
For those who have not read the Modelling by numbers series, I would recommend reading part 1A before continuing with this tutorial.
Terrain
Unity assets – Unity package file containing scripts and scenes for this tutorial.
Source files – Just the source files, for those that don’t have Unity.
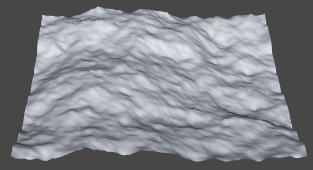
A very common application for procedural mesh generation is terrain. We are going to have a look at some simple ways of generating terrain meshes.
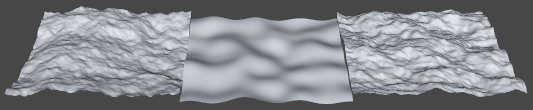
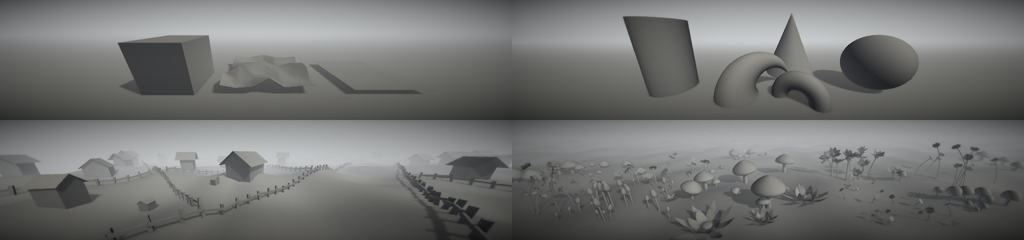
Some procedural terrains. Diamond-square (left), simple Perlin noise (middle) and layered Perlin noise (right).
Common terrain options
We’ll start with a quick pros/cons survey of some common ways to make a terrain in Unity.
Pre-made mesh
A mesh made in a 3D art package such as Maya, Max or Blender, or perhaps even an application that specialises in terrain creation.
Pros
- You can have whatever you like as terrain.
- Not height-based. Have as many holes, caves, pockets and vertical surfaces as you want.
- Terrain/level design and game design can be made to work very closely together.
Cons
- 3D art software, and/or external terrain generation tools (and knowledge of how to use them) are necessary.
- Optimisation often needs to be done by hand.
Unity terrain
Unity terrain is the solution that comes built in with Unity. At the most basic level, it’s just a heightmapped plane, with a mesh that recalculates its mesh structure to give more polygons where the player is, and less far away.
Unity terrain comes with a bunch of tools in the Unity editor, plus a vegetation system that works over the top of it.
Pros
- The back-end work is done for you. Just paint up a terrain and you’re away.
- The tools and UI are friendly for non-programmers
- Vegetation system
- Polygon resolution/tessellation is taken care of for you (not always a pro, see below).
Cons
- Vertex data cannot be controlled (no putting extra information in uv2 or vertex colour streams, for example). This is not much of an issue unless you’re like me and insist on putting custom shaders on everything.
- Moving over the terrain at high speed results in the mesh tessellation constantly being recalculated, causing bits of it to jump around on the screen every few moments.
Heightmapped plane
A heightmapped terrain uses a texture to define height values over an area.
Pros
- Implementation is simple.
- Using a dynamic texture or render target makes it easy to create terrain that is deformable at runtime.
Cons
- The terrain will only be as good as the heightmap that generates it. Generating good heightmaps takes skill and/or powerful tools.
- Placing objects on the terrain will require either raycasting or sampling a texture. This may be slow, especially for large numbers of objects.
Perlin noise
Perlin noise is a type of pseudo-random noise that determines height values mathematically.
Pros
- No size or boundary limitations: height data does not need to be stored anywhere.
- No dependance on initialisation order: the height offset at any point can be determined mathematically, before the terrain itself is generated.
- Very quick to add to a level, due to no asset dependencies.
Cons
- There is less control over the result compared to height-mapped methods.
Diamond-square algorithm
Diamond-square is an extended/improved version of the midpoint displacement algorithm. The basic principle is that the terrain area is subdivided, with each subdivision receiving a height offset. This process repeats, with the subdivisions getting smaller and smaller.
Pros
- No asset dependencies.
Cons
- Implementation is more complicated than the other methods.
- Possible initialisation order issues: Terrain data must be generated before anything else can be placed on it.
Some from column A, some from column B
It’s possible to mix and match methods. It’s not uncommon to generate a terrain using a procedural method and then modify the resulting mesh by hand. Or a hand-made/heightmapped mesh might have a noise applied over the top to give it a bit of roughness or randomness. The Unity terrain engine is also able to import and export heightmaps.
OK, let’s write some code
We’re now going to take a closer look at three of the methods described above: a height mapped plane, perlin noise and the diamond-square algorithm.
General terrain mesh generation
The code that does the bulk of the mesh generation is the same for all three methods. Also, we’ve done it before. Anyone fresh out of Modelling by numbers: Part One A will find this code familiar:
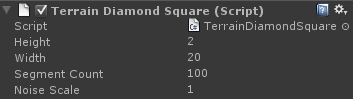
public abstract class ProcTerrain : MonoBehaviour
{
    public float m_Height = 1.0f;
    public float m_Width = 20.0f;
    public int m_SegmentCount = 100;

    public abstract float GetY(float x, float z);

    protected virtual void Start()
    {
        MeshBuilder meshBuilder = new MeshBuilder();

        float segmentSize = m_Width / m_SegmentCount;

        Matrix4x4 meshTransform = transform.localToWorldMatrix;

        for (int i = 0; i <= m_SegmentCount; i++)
        {
            float z = segmentSize * i;
            float v = (1.0f / m_SegmentCount) * i;

            for (int j = 0; j <= m_SegmentCount; j++)
            {
                float x = segmentSize * j;
                float u = (1.0f / m_SegmentCount) * j;

                Vector3 offset = new Vector3(x, GetY(x, z), z);

                Vector2 uv = new Vector2(u, v);
                bool buildTriangles = i > 0 && j > 0;

                BuildQuadForGrid(meshBuilder, offset, uv, buildTriangles, m_SegmentCount + 1);
            }
        }

        Mesh mesh = meshBuilder.CreateMesh();

        mesh.RecalculateNormals();

        //Look for a MeshFilter component attached to this GameObject:
        MeshFilter filter = GetComponent();

        //If the MeshFilter exists, attach the new mesh to it.
        //Assuming the GameObject also has a renderer attached, our new mesh will now be visible in the scene.
        if (filter != null)
        {
            filter.sharedMesh = mesh;
        }
    }

    private void BuildQuadForGrid(MeshBuilder meshBuilder, Vector3 position, Vector2 uv, bool buildTriangles, int vertsPerRow)
    {
        meshBuilder.Vertices.Add(position);
        meshBuilder.UVs.Add(uv);

        if (buildTriangles)
        {
            int baseIndex = meshBuilder.Vertices.Count - 1;

            int index0 = baseIndex;
            int index1 = baseIndex - 1;
            int index2 = baseIndex - vertsPerRow;
            int index3 = baseIndex - vertsPerRow - 1;

            meshBuilder.AddTriangle(index0, index2, index1);
            meshBuilder.AddTriangle(index2, index3, index1);
        }
    }
}
Most of this code comes straight from the ground mesh part of the first tutorial. We are building a set of quads in a grid formation. It’s all wrapped up in an abstract class that we’ll derive from for each of our terrain methods.
In that first tutorial, we used a random number to offset the Y value of each vertex in the plane. We did this because it was simple, but to make an actual, decent terrain, we need to do something fancier here. The code above declares a GetY() function, that we call to offset each vertex in the mesh. It takes 2 arguments, the X and Z position of that same vertex. What we actually do inside that function depends on which terrain method we’re using.
Onward now, to the interesting stuff. For each different terrain generation method, we’ll derive a child class from ProcTerrain and override GetY().
Heightmap
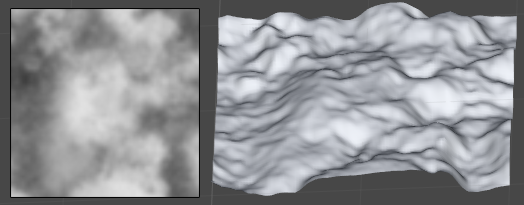
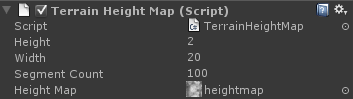
First, we’ll generate terrain based on a pre-made heightmap texture. Our Y values are based on the brightness of each pixel:
public override float GetY(float x, float z)
{
    if (m_HeightMap != null)
    {
        Color mapColour = m_HeightMap.GetPixelBilinear(x / m_Width, z / m_Width);

        return mapColour.grayscale * m_Height;
    }

    return 0.0f;
}
The X and Z coordinates are converted to UV coordinates using the width of the terrain. Using this, we sample a heightmap texture to get the colour value at that point.
The height is the greyscale value of the pixel. We multiply this value by the terrain height to get the final Y offset.
There’s an issue here that’s easy to run into. In Unity, we cannot access pixels in textures that do not have the “Read/Write Enabled” checkbox ticked in the import settings. This is unticked by default, and easy to forget about (or get missed if the person adding the heightmap doesn’t know about it). To keep things running smoothly, we need to add a check to our code for this to avoid trying to access an unreadable texture (and getting an error for every single vertex in our mesh, potentially bringing Unity to its knees). Annoyingly, Unity provides us with no way of checking, so we need to try accessing and then catch the exception:
private bool m_TextureIsReadable = false;
private bool m_TextureChecked = false;

private bool IsTextureReadable(Texture2D texture)
{
    if (m_TextureChecked)
        return m_TextureIsReadable;

    if (texture != null)
    {
        m_TextureChecked = true;

        try
        {
            texture.GetPixel(0, 0);
            m_TextureIsReadable = true;
            return true;
        }
        catch
        {
            Debug.LogError("Could not sample texture. Read/write may not be enabled. Please check the import settings.");
        }
    }

    return false;
}
This function tries to get a pixel from our heightmap, and returns true if that succeeds. We use an additional variable, m_TextureChecked, to ensure that we only check the texture once. Otherwise, we’d have to go through that try/catch block for every vertex, which would not be quick.
Now GetY() has to call that function:
public override float GetY(float x, float z)
{

    if (IsTextureReadable(m_HeightMap))
    {
        Color mapColour = m_HeightMap.GetPixelBilinear(x / m_Width, z / m_Width);

        return mapColour.grayscale * m_Height;
    }

    return 0.0f;
}
Perlin noise
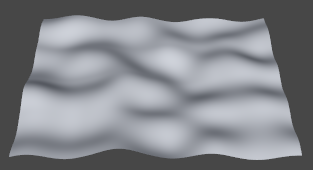
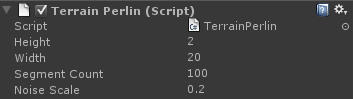
This is a very simple terrain method that doesn’t require a heightmap and is quick to implement. In its simplest form, it gives a very smooth, rolling hills effect, although roughness can be added by layering the noise (we’ll do this in a moment).
public override float GetY(float x, float z)
{
    float perlinX = x * m_NoiseScale;
    float perlinZ = z * m_NoiseScale;
    return Mathf.PerlinNoise(perlinX, perlinZ) * m_Height;
}
We’re using Mathf.PerlinNoise() to generate the height. Official documentation on this function is pretty sparse, which is a little frustrating. Basically, the function takes in two values and spits out a number between zero and one. Increasing m_NoiseScale will increase the amount of noise detail, making smaller bumps, and decreasing it will do the opposite.
One thing to watch out for is that whole number inputs will always return the same result, so if we’re calling GetY at whole number intervals and m_NoiseScale is also set to a whole number, our terrain will come out flat. m_NoiseScale should always be set to a fractional number. If the script is going to be handed over to someone unaware of this, it may be worth enforcing it in code.
Adding randomness
The terrain generated using this method will be the same every time. We can add randomness by offsetting the values passed into the PerlinNoise() function.
float perlinX = x * m_NoiseScale / mul + offsetX;
float perlinZ = z * m_NoiseScale / mul + offsetZ;
return Mathf.PerlinNoise(perlinX, perlinZ) * m_Height;
The values offsetX and offsetZ could be defined in the editor, loaded from a file, or even re-generated on a button press. As long as they stay the same, we’ll get the same terrain every time. When they change it’ll be different.
Layered noise
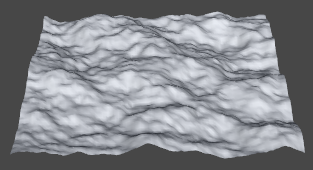
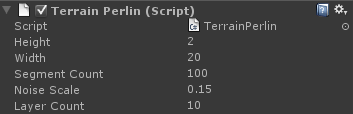
It’s possible to apply Perlin noise in layers to get a rougher looking effect. This is also referred to as fractal perlin noise.
public override float GetY(float x, float z)
{
    float mul = 1.0f;
    float y = 0.0f;
    float totalPossibleSum = 0.0f;

    for (int i = 0; i < m_LayerCount; i++)
    {
        float perlinX = x * m_NoiseScale / mul;
        float perlinZ = z * m_NoiseScale / mul;
        float noise = Mathf.PerlinNoise(perlinX, perlinZ);
        y += noise * mul;

        totalPossibleSum += mul;
        mul *= 0.5f;
    }

    return (y / totalPossibleSum) * m_Height;
}
With each layer, we increase the noise scale, and decrease the height multiplier. We add all the layered values together, dividing by the total possible sum to get a normalised value.
Diamond-square
This method is more involved than the others, but can get good results. I’d like to admit upfront that my experience with this algorithm is limited: my usual personal preference is to work with Perlin noise. I’ll try my best to explain it well. Some other good explanations can be found here or here.
The diamond-square algorithm is an extension of midpoint displacement. The basic idea is to offset points on a grid, with the grid (and offset) getting smaller and smaller with each pass.
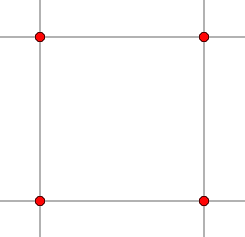
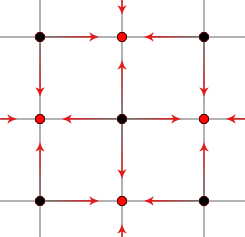
We begin with our seed values. These are random values that will define the overall layout of the terrain.
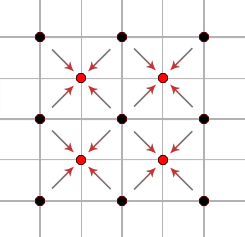
Next, we calculate the height at the centre of each group of four seed points, averaging the outer values and adding a small random offset.
The next step is very similar, except that we calculate from the values directly adjacent, rather than diagonal, from the centre point.
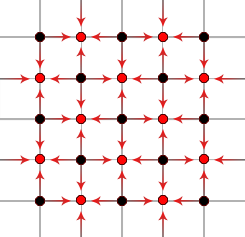
The steps repeat, getting smaller and smaller, until the grid is full.
That’s the basic idea of the algorithm, on to the code. We’re going to generate all our height values once at the beginning (in the Start() function), and then have GetY() reference them later.
We’ll begin by defining a function that’s going to be called a lot by the following code. What it does is take a row and column reference and turn that into an index to the height values array. This gives us two nice things. First, it means the rest of our code can just work in rows and columns without worrying about how to convert. Second, we can decide here how we want to handle values off the edge of the grid. For this tutorial, the values wrap around to the other side of the grid. An alternative is to clamp the values to the edge, although you’ll get less variation that way.
int GetHeightIndex(int col, int row)
{
    row = (int)Mathf.Repeat((float)row, (float)m_ValueSegmentCount);
    col = (int)Mathf.Repeat((float)col, (float)m_ValueSegmentCount);

    return row * m_ValueSegmentCount + col;
}
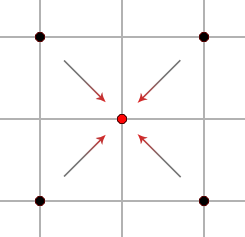
Now we define the square step. This function looks at the four corner points on a grid square and averages their height. This height, with a random offset, is assigned to the point in the centre. We will record the max and min height values so that all the values can be properly normalised later (values have to be normalised if we’re going to store them in a texture):
void SquareStep(int col, int row, int stepSize, float heightScale)
{
    float height = 0.0f;

    height += m_HeightValues[GetHeightIndex(col - stepSize, row - stepSize)] * 0.25f;
    height += m_HeightValues[GetHeightIndex(col + stepSize, row - stepSize)] * 0.25f;
    height += m_HeightValues[GetHeightIndex(col - stepSize, row + stepSize)] * 0.25f;
    height += m_HeightValues[GetHeightIndex(col + stepSize, row + stepSize)] * 0.25f;

    float newValue = height + Random.Range(-1.0f, 1.0f) * heightScale;
    m_HeightValues[GetHeightIndex(col, row)] = newValue;

    m_MaxHeight = Mathf.Max(m_MaxHeight, newValue);
    m_MinHeight = Mathf.Min(m_MinHeight, newValue);
}
And then the diamond step. Similar to the square step, except that the four outer points are diagonal from each other, forming a diamond shape around the centre point.
void DiamondStep(int col, int row, int stepSize, float heightScale)
{
    float height = 0.0f;

    height += m_HeightValues[GetHeightIndex(col - stepSize, row)] * 0.25f;
    height += m_HeightValues[GetHeightIndex(col + stepSize, row)] * 0.25f;
    height += m_HeightValues[GetHeightIndex(col, row - stepSize)] * 0.25f;
    height += m_HeightValues[GetHeightIndex(col, row + stepSize)] * 0.25f;

    float newValue = height + Random.Range(-1.0f, 1.0f) * heightScale;
    m_HeightValues[GetHeightIndex(col, row)] = newValue;

    m_MaxHeight = Mathf.Max(m_MaxHeight, newValue);
    m_MinHeight = Mathf.Min(m_MinHeight, newValue);
}
Now we can put these steps together into a single pass. That is, one iteration over the mesh at a given grid size:
void DiamondSquarePass(int stepSize, float scale)
{
    int halfStep = stepSize / 2;

    for (int row = halfStep; row < m_ValueSegmentCount + halfStep; row += stepSize)
    {
        for (int col = halfStep; col < m_ValueSegmentCount + halfStep; col += stepSize)
        {
            SquareStep(col, row, halfStep, scale);
        }
    }

    for (int row = 0; row < m_ValueSegmentCount; row += stepSize)
    {
        for (int col = 0; col < m_ValueSegmentCount; col += stepSize)
        {
            DiamondStep(col + halfStep, row, halfStep, scale);
            DiamondStep(col, row + halfStep, halfStep, scale);
        }
    }
}
Now to put everything together. We begin by initialising our height array and zeroing the values. Our height data will eventually be stored in a texture, but we will generate the values using a float array for greater precision and then convert at the end:
protected override void Start()
{
    m_ValueSegmentCount = Mathf.NextPowerOfTwo(m_SegmentCount);

    m_HeightValues = new float[m_ValueSegmentCount * m_ValueSegmentCount];

    for (int i = 0; i < m_HeightValues.Length; i++)
    {
        m_HeightValues[i] = 0.0f;
    }
Then we initialise our seed values. These are the initial random values that the main features of our terrain will be based on.
    int stepSize = Mathf.NextPowerOfTwo(Mathf.RoundToInt(m_NoiseScale * m_ValueSegmentCount));
    float scale = 1.0f;

    //seed values:
    for (int y = 0; y < m_ValueSegmentCount; y += stepSize)
    {
        for (int x = 0; x < m_ValueSegmentCount; x += stepSize)
        {
            m_HeightValues[GetHeightIndex(x, y)] = Random.Range(-1.0f, 1.0f);
        }
    }
With our array and seed values all ready, we can do the actual diamond-square passes and then build the mesh. The passes get progressively smaller until they reach a size of one. At this point, we have height data for every point on the grid.
    //passes
    while (stepSize > 1)
    {
        DiamondSquarePass(stepSize, scale);
        stepSize /= 2;
        scale *= 0.5f;
    }
We’re going to store the final values in a texture for easy, bilinear sampling goodness. We assign all the height values to a colour array, after normalising them, and then apply them to our texture:
    float scaleToNormalise = 1.0f / (m_MaxHeight - m_MinHeight);
    Color[] pixelValues = new Color[m_HeightValues.Length];
    m_HeightTexture = new Texture2D(m_ValueSegmentCount, m_ValueSegmentCount, TextureFormat.Alpha8, false, true);

    for (int i = 0; i < m_HeightValues.Length; i++)
    {
        float val = (m_HeightValues[i] - m_MinHeight) * scaleToNormalise;
        pixelValues[i] = new Color(val, val, val, val);
    }

    m_HeightTexture.SetPixels(pixelValues);
    m_HeightTexture.Apply();
And last of all, we call the base Start() function, which will build the mesh:
    //build the mesh:
    base.Start();
} //end Start()
That is the data generation step. It leaves us with a texture full of height values. Our final GetY() function is now very similar to that used by the heightmapped terrain, although slightly simpler because we created the texture ourselves, so we already know about its readability and pixel format:
public override float GetY(float x, float z)
{
    if (m_HeightTexture != null)
    {
        Color col = m_HeightTexture.GetPixelBilinear(x / m_Width, z / m_Width);
        return col.a * m_Height;
    }

    return 0.0f;
}
Note: This terrain method, unlike the others, is dependent on script execution order. Y offsets cannot be calculated until the height values are built. If objects are to be placed on this terrain, make sure that this script is going to be executed first.
Controlling randomness
Unlike Perlin noise, this method will generate a different terrain every time. Sometimes, this is exactly what we want. Other times, we want a guaranteed result.
The way we get a guaranteed result is by seeding the random number generator to a predefined value:
int oldSeed = Random.seed;
Random.seed = m_RandomSeed;

//generate the height data here

Random.seed = oldSeed;
Just like our Perlin offset values, randomSeed could be defined in a number of ways. As long as it stays the same, we’ll get the same terrain every time it is built.
Placing objects on the terrain
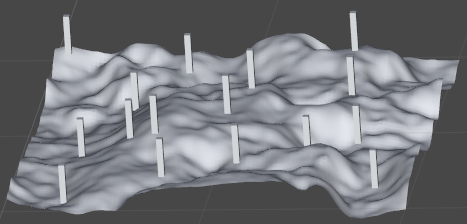
Now that we have a terrain, lets make sure that all our scene objects are sitting on it properly.
To do this, we’ll create a TerrainOffset script that looks at the terrain and offsets its own height accordingly:
public class TerrainOffset: MonoBehaviour
{
    public float m_YOffset;
    public ProcTerrain m_ProcTerrain;

    private void Start()
    {
        Vector3 position = transform.position;

        position.y = m_ProcTerrain.GetY(position.x, position.z) + m_YOffset;

        transform.position = position;
    }
}
Pretty simple. Just throw this script onto any game object that needs its height at terrain level. We’ve added an offset to the Y, just in case we have an object that we need just above or below terrain level (very often objects will look better if they are sunk into the ground a little).
There’s a problem with this setup, however: ProcTerrain.GetY() is working in the local space of the terrain mesh. If the terrain GameObject is sitting on the world origin and isn’t transformed at all, this won’t be an issue, however if you ever want to move, rotate or scale the terrain mesh, then local and world space aren’t going to line up anymore.
What we’re going to do about this is to make a new method for ProcTerrain that knows about world space:
public Vector3 GetWorldPosition(float xPosition, float zPosition, float yOffset)
{
    Vector3 localGroundPos = transform.worldToLocalMatrix.MultiplyPoint3x4(new Vector3(xPosition, 0.0f, zPosition));
    localGroundPos.y = GetY(localGroundPos.x, localGroundPos.z) + yOffset;

    return transform.localToWorldMatrix.MultiplyPoint3x4(localGroundPos);
}
This function takes the world space X and Z coordinates and transforms them into local space before passing them on to the GetY() function. Our TerrainOffset script calls this function instead of GetY():
public class TerrainOffset: MonoBehaviour
{
    public float m_YOffset;
    public ProcTerrain m_ProcTerrain;

    private void Start()
    {
        Vector3 position = transform.position;

        transform.position = m_Terrain.GetWorldPosition(position.x, position.z, m_YOffset);
    }
}
Now we can transform the terrain mesh and still place objects on it.

Is there anyway you can go over real-time mesh manipulation/deformation or terrain deformation. My current goal is to make tree objects (or similar object) that you actually slice in real time using a slicing plane or even a mouse input. Another nice feature would be able to tunnel or cave into a generated terrain, something similar to “voxel” games without the ugly looking blocks. Any help on this topic would be nice.
The tricky thing is that when you’re modelling terrain by a heightmapped plane, you can’t tunnel at all. In fact, you can’t have any concave surfaces at all (like a rocky overhang). One way to achieve this through code would be to create ‘holes’ in the convex shape whenever the terrain turns concave. Then, a separate mesh could be generated for the inside of the concave section of terrain (e.g. a cave).
Although, if you are planning on having your terrain be dynamically tunnel-able, using a straight heightmapped plane might not be the best way to go.
Really great information on your site about procedural mesh’s and unity3d. I was looking for something exactly like this. Thanks for passing on your fantastic knowledge to the broader web community. I would love to see a series on how to procedurally UV map and texture the meshes you create.
Excellent tutorial !
And what about colors/Textures in the Modelling by numbers serie?
Can you give us any hint, pls?