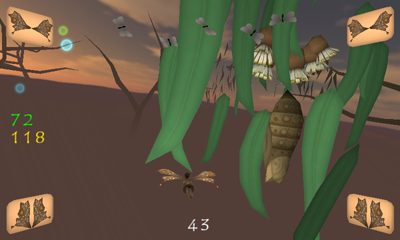
A bit of background first, on both Min Min and me. Min Min is a game built for Android phones (with plans to port to iPhone) using the Unity engine. It’s not quite finished yet, but that’ll happen soon. Before Min Min, I’d been using Unity professionally for about two years, on PC and XBox 360 games. I also had a small amount of experience building apps for Android.
Making Min Min has been a performance battle right from the start. Not an unwelcome one, since I knew what I had in mind visuals-wise was a little ambitious before I began, and there’s a lot of satisfaction to be had from winning those battles.
I’ve learned a lot from Min Min, especially when it comes to performance with Unity on Android devices, so I figure I might try sharing some of that knowledge, on the chance that it’s helpful to someone.
Since most of the struggles have been performance related (minimum target hardware for Min Min is Nexus One, HTC Desire and similar), I’ll concentrate on that aspect here.
It should go without saying that gameplay should come above everything else, and that your game doesn’t need to push the device to its limits in order to be good. I’m not going to try and tell you how to make a good game. But perhaps I can help make it run a little better.
So, some bits and pieces I’ve picked up…
Choosing Your Battles
int main()
{
    return 0;
}
That is the source code for a perfectly optimised application. You don’t even need a game engine. Just use this code and you’re done. Problem is, even a non-programmer can see that this isn’t going to be much fun to play.
The problem with it is this: we don’t want to make a perfectly optimised application, we want to make a game. We want features, we want cool, pretty and complicated stuff, and (if we’re reading this) we probably want more of it than we can afford. Everything has a cost – you need to find out how much you can spend, and decide what to spend it on.
Those decisions will be different for every team and every project. Every single piece of advice here can be discarded if it’s going to make your game not worth it. Don’t kill the game just because some website says that will make it run quicker. But know the cost of that choice, and expect to have to sacrifice something of lower priority. And if you’re working in team, make sure everyone has their priorities in the same order.
A Min Min example. Min Min sets a high priority on visuals. Shaders are my thing, and I wanted a project that made the most of them.
I wanted a procedural level, with objects able to take any position and rotation. Plus I wanted a moving per-pixel point light to follow the character. For me, these were must-haves.
The procedural placement doesn’t get along so well with light mapping – one render-saving tool out the window.. As for my point light, most documentation regarding doing this on mobile can summed up as “Don’t. Just don’t”.
Well, I went and did it anyway, ignoring all that advice. But I ignored it knowing the cost. For example, I’ve had to exclude devices without OpenGLES 2.0 support. Other things, like fancy physics, are now out of the question. For me and this project, those are sacrifices worth making.
(I will say, however, lightmaps and static lighting are good bits of advice. If you don’t want to spend half your dev time messing around with shaders and rendering code, I suggest you follow them – trust me)
The key with all of this is to decide what’s important early – that way you can get the absolute most out of whatever hardware you’re using, because you’ve designed your game that way, instead of trying to straighten it all out later.
Placeholder Performance Eaters
Basically, get your game working as hard as it’s ever going to work as early as possible.
A familiar situation to many game developers:
Programmer: “Hey, you know that asset you just finished?”
Artist: “Is it in? How does it look?”
Programmer: “It looks awesome, really awesome, only… the game now runs at 8 fps.”
And then a whole bunch of art needs to be re-done, with that particular awesome piece cut completely due to the milestone in 2 days’ time. That’s a lot of wasted work.
I wanted to avoid this kind of thing. To that end, Min Min placeholder art had full-resolution textures before any of the textures had been created. Lots of flat white, but all the pixels that there were ever going to be. Placeholder meshes were simple shapes, but I used meshes with poly-counts that were about right. And all the materials were doing all the things they were going to be doing from the start.
It worked really well. There were no nasty surprises when the actual assets went in. At least, not performance-wise. It let me see all the performance pitfalls early, and let me re-adjust the goals of the project while there was still time to do so. It also meant that I had a good idea what the limitations for assets were before I started them.
A similar thing can be applied to sound, and even code. Also to games for high-end platforms. Are your 10,000 poly meshes going to use 1024X1024 diffuse, normal and spec maps? Then don’t use a 12 poly cube with the Unity default diffuse material as your placeholder.
One Texture to Rule Them All
Combining and reusing textures is nice way to increase rendering performance. Basically, it saves the renderer from having to keep switching from one texture to another as it draws each object to the screen. I’ll explain Min Min’s texture setup.
In game there is only one texture on the screen. The pause menu adds a second one for the text.

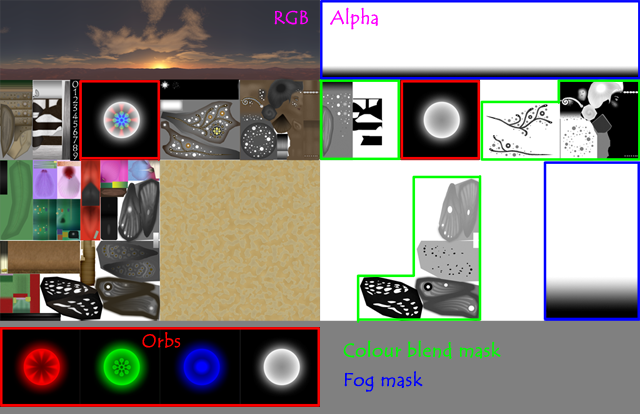
The main Min Min texture (actual size is 1024X1024), broken down:

Most of the extra bits of information are stored in the alpha channel, such a colour blend map (for controlling the objects in the game that can change colour), and a mask for fog on the sky texture and at the bottom of tree trunks. The pickup orbs are billboard objects of a single colour. Because I only need an 8-bit grey texture for each one, I can have them share texture space and put one in each colour channel.
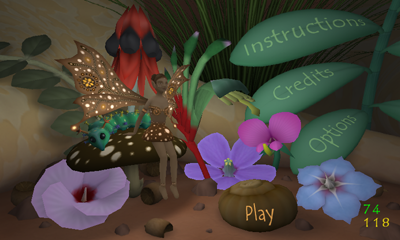
In the front end, there are 3 textures on screen with no menus displayed, going up to 6 in the options menu. This includes fonts.

3D objects share the same main texture as the game level. The background is pre-rendered. However, because the light colour is changing, the lighting needs to be at least partly real time. So the pre-rendered texture stores the objects’ base texture colour in the RGB channels and a diffuse multiplier in the alpha:

A bit of trivia: This texture is rendered in Unity, with shaders that output to the correct channels and a script that saves the resulting image. Lighting is done by those shaders, with shadow maps rendered out of a matching scene in 3D Studio Max.
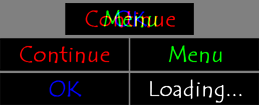
Min Min also uses 3D text objects, labels that are aligned with, and curved over, objects in the scene. Because these labels exist in 3D space, I can’t use Unity fonts, so the labels need their own texture containing the text. Storing one label in each channel, I only need two of these textures – one for the front menu and one for the game level, the loading screen and results screen.

Another bit of trivia: These label textures are generated by a script which takes the text straight from a strings spreadsheet and generates one for each locale, keeping localisation easy.
One-pass Rendering
Having custom shaders opens up a whole lot of possibilities. An example is the soft lighting of the Min Min world, which comes from the lighting model that all the shaders are using. But one major thing you can do with shaders is optimise for your game, making sure the renderer is doing nothing it doesn’t need to.
In standard forward rendering, each object is drawn to the screen a number of times. First for an ambient pass, and then once for every light illuminating the object. These all add up to produce the lit object you see on the screen. This a nice and flexible system that can deal with any number of lights – you just keep rendering till they’re all done.
It’s rarely fast, however. In Min Min, no object is ever under the influence of more than one light. The awesome thing about this is that I can have a shader that draws the lighting and the ambient at the same time, putting the result on the screen in one go.
There are pros and cons to this:
Pro: the performance increase is massive. Without it, there would be so many other cuts I’d have to make in order to make the game perform well.
Con: the Unity engine doesn’t know how your custom shaders work, so there are things you need to do manually that Unity would normally do behind the scenes. The Min Min setup basically involves bypassing Unity’s lighting system, so all the lighting information needs to be passed to each material via a script each time it changes. Another reason to share materials whenever possible.
LODs are Your Friends
Level of detail is one of the awesome features that came with Unity 3.5. I had implemented a custom LOD system for Min Min prior to that update, but the Unity system was both faster and had a nicer way of deciding which LOD should be displayed.
I should, however, note that LODing is a Unity Pro feature.
Particle System Sharing
Min Min’s particle setup is pretty basic: The player character trails sparkles when under the influence of a pickup, and there are cocoon objects surrounded by glowy particles when they’re able to be opened. Also there are sparkly bursts when significant things happen.
It’s the cocoons that were the major issue here. There are quite a lot of them in the level, and they all need to emit particles at the same time. The original setup was to simply include the particle system in the cocoon’s prefab, so each cocoon ended up with its own emitter. The problem is that updating all those particle systems is quite a drain. The good news is that particles can be shared between objects at different locations. Some script for you:
foreach (GameObject cocoon in m_Cocoons)
{
    m_ParticleEmitter.transform.position = cocoon.transform.position;
    m_ParticleEmitter.Emit();
}
What this is doing is moving the the particle emitter to the cocoon’s location and explicitly telling it to emit particles, and doing this for every cocoon. Instead of every cocoon object having its own particle emitter, they all share one. The result of doing it this way was a 10% frame rate increase.
Recently, particles in Unity got a massive facelift with the Shuriken particle engine. Yes, they’re awesome and allow you to do so much fancy stuff, but they’re also slower. Quite a lot slower. As Min Min’s particle needs are simple, I’ve stuck with the legacy system.
Scripting Pitfalls
Minimise Monobehaviour Overrides – Call the Functions Yourself
The Monobehaviour overrides are very convenient. Just define Update() in your script and it’ll magically get called each update. And for most things, that’s fine. Issues only start coming up when you have lots of these in your scene. In this case, it’s quicker to use some kind of manager class, which loops through all those objects and calls an explicit update function.
foreach (CustomObject obj in m_MyObjects)
{
    obj.ExplicitUpdate();
}
For many scripts, the difference this makes is negligible. Just use the Monobehaviour Update() for things like your main character. The explicit update is only useful when the number of objects gets into the hundreds. In these cases the performance difference can be very large.
Another advantage of doing it yourself is that you can be smarter about deciding what needs to be updated when. Maybe your object doesn’t need an update every frame. Maybe it doesn’t need updating when way off in the distance. This is the case with the Min Min collectable objects, which are stored in an oct-tree structure that can be checked for objects in the vicinity of the player, and then only these get updated.
Minimise transform access
Another scripting issue that pops up with a large number of objects is access to an object’s Transform component. Say you have a whole bunch of objects that need to check against a single transform, like the Min Min pickup orbs, which need to check the player position, or my old LOD system, which needed the camera transform. Having each of those objects reference player.transform within their own code gets slow. I’ve found that it can be much quicker to access once and then pass it along:
Vector3 position = player.transform.position;

foreach (Pickup pickup in m_Pickups)
{
    pickup.CheckPlayerPosition(position);
}
Last but not Least
This list is not exhaustive, it’s just the things that were most helpful for this project. For further reading, I highly recommend the official Unity documentation on the subject:
Practical Guide to Optimization for Mobiles – Optimizing Scripts
Optimizing Graphics Performance
I’ll finish up with one final piece of advice: Test your game, constantly, from the beginning. Get to know what’s helping and run with that – whatever it is.
